
Disclosure: This article may contain affiliate links. If you decide to make a purchase, I'll make a small commission at no extra cost to you.
Articles in this series:
- Hardware, Electronics, and ESPHome code
- Lovelace User Interface
- Entities & Simplified User Interface
DIY Irrigation Controller Part 2
While my the Irrigation Controller can be manually started and stopped with physical buttons, the primary user interface was always intended to be built in Lovelace.
Reliability Update
Before I describe how I created the interface I have great news! In the 2 months since I put the controller into service it has been rock solid! At the moment the Uptime is up to 248 hours since the last time it restarted. The only times it has been restarted has been once to upload a tweak to my ESPHome code, and the second one was for a neighborhood-wide power outage!!! :)
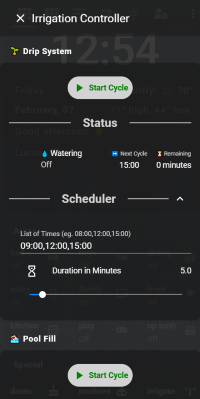
Building A User Interface
Each Zone consists of the following:
- Manual on/off switch.
- Status Display showing: Is It Running, Next Scheduled Time, and Time Remaining.
- Scheduler: field to enter a comma separated list of times, and a slider to select the runtime in minutes.
1
2
3
4
5
6
7
8
9
10
11
12
13
14
15
16
17
18
19
20
21
22
23
24
25
26
27
28
29
30
31
32
33
34
35
36
37
38
39
40
41
42
43
44
45
46
47
48
49
50
51
52
53
54
55
56
57
58
59
60
61
62
63
64
65
66
67
68
69
70
71
72
73

type: vertical-stack
cards:
  - type: markdown
    style: |
      ha-card {
        background: none;
        box-shadow: none;
        letter-spacing: 0.06em;
        margin: 0 0 -1em 0;
        padding: 0;
      }
    content: |-
      **🌱 Drip System**

- type: entities
  show_header_toggle: false
  entities:
    - type: custom:paper-buttons-row
      buttons:
        - entity: switch.irrigation_zone1
          name: Start Cycle
          state_icons:
            "off": mdi:play
            "on": mdi:stop
          style:
            button:
            background: lightgray
            border-radius: 9999px
            font-weight: bold
          state_styles:
            "off":
              button:
                color: red
              ripple:
                color: red
            "on":
              button:
                color: green
              ripple:
                color: green

    - type: custom:text-divider-row
      text: Status

    - type: custom:multiple-entity-row
      entity: binary_sensor.irrigation_zone1
      name: 💧 Watering
      icon: "[[icon]]"
      show_state: false
      secondary_info:
        entity: binary_sensor.irrigation_zone1
        name: ""
      entities:
        - entity: sensor.irrigation_zone1_next
          name: ⏭️ Next
        - entity: sensor.irrigation_zone1_remaining
          name: ⏳ Remaining
          unit: min

        - type: custom:fold-entity-row
          head:
            type: custom:text-divider-row
            text: Scheduler
          entities:
            - type: custom:text-input-row
              entity: input_text.irrigation_zone1_times
            - entity: sensor.irrigation_zone1_duration
              name: Duration in Minutes
              icon: mdi:timer-sand
            - type: custom:slider-entity-row
              entity: input_number.irrigation_zone1_duration
              full_row: true
              hide_state: true
Controller Status
At the bottom I include “glance” sensors displaying the status of the controller.
1
2
3
4
5
6
7
8

  - type: glance
    entities:
      - entity: binary_sensor.irrigation_controller_status
        name: Status
      - entity: sensor.irrigation_controller_uptime
        name: Uptime
      - entity: sensor.irrigation_controller_wifi_signal
        name: WiFi Signal
Let me know if you have any questions.