

Disclosure: This article may contain affiliate links. If you decide to make a purchase, I'll make a small commission at no extra cost to you.
Articles in this series:
- Hardware, Electronics, and ESPHome code
- Lovelace User Interface
- Entities & Simplified User Interface
This project took a long time to put together. There were a lot more frustrations than I expected. At times I had concerns about being able to pull it off. But I am prouder of this accomplishment, than anything else I have done with Home Assistant!!!
Impetus
My first attempt at a solution
One of my earlier Home Automation purchases was a simple $100 WiFi irrigation controller which hooked onto a hose faucet and the irrigation schedule could be controlled via the cloud. The controller lives on the far side of the house and requires navigating a minefield… left by our dogs. So I was excited about the prospect of not having to walk over there as often to adjust the schedule.
“Are my plants getting watered?”
Unfortunately this product suffered from a number of problems, most of which are not the fault of the designer, but were in fact my fault for choosing the easy way out. The primary problems I had were: the batteries only lasted a few months and were difficult the change, and the WiFi was not as reliable as I expected (even after installing a UniFi Wireless Access Point about 10 feet away in a closet nearby). For a long time the only way I knew the plants were not getting water was when my wife would ask “Are my plants getting watered?”
Home Assistant to the rescue?
In 2018 I started playing with Home Assistant and I added a warning to the Home Assistant UI when the irrigation controller was offline. Unfortunately, the darn thing bounced between being online and offline so often I ignored it. I would rationalize that its almost always rights itself, so there is no need to do anything about it this time… right? By the time it occurred to me that I could activate a notification only when it had been offline for 2 hours straight, I was already sick and tired of fighting with this piece of technology.
Inspiration
ESPHome
Last year I started exploring writing code to control my own devices with ESPHome. After living with a bunch of Tuya, Sonoff, Shelly devices, and an ESP32 board, I realized how reliable these devices were. It occurs to me that I could probably create a more reliable Irrigation Controller.
After seeing several other people create Irrigation Controllers out of a Sonoff 4CH Pro R2, I decided instead of spending $200-300 on a fancy Irrigation Controller that I had no control over, I could create my own… for around $50 (including this 24vac transformer to power the solenoids)!
DIY Irrigation Controller
Ultimate Goals
- Create a reliable Irrigation Controller.
- Make it self sufficient:
- Does not require Home Assistant to start a schedule session.
- Use Home Assistant only to edit the schedule, manually start a cycle, and to monitor progress.
Irrigation Controller Supplies
- Sonoff 4CH Pro R2 (<- the new R3 should work)
- Elk TRG2440 24VAC, 40 VA AC Transformer
- Irrigation Controller Outdoor Enclosure (Optional: if you already have a safe place for your controller).
- Electrical extension cord: I ended up cutting a spare extension cord I had, I stripped the ends of the wires to power the Sonoff.
What was needed regardless of the controller used
These items would have been needed if I had purchased a $200-$300 off the shelf controller. Which is why I didn’t include these in the cost estimate for my $50 DIY Irrigation Controller project.
Irrigation System
Note: I already existing Drip System pipes running to this location, so I only need to replace the control solenoid portion.
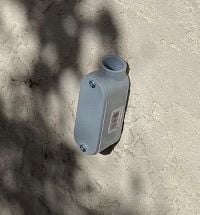
- Orbit 3-Valve Heavy Duty Preassembled Manifold
- Outdoor wiring to connect the solenoids to the Sonoff.
- Water resistant wire nuts to connect the wires to the solenoid wires (included in the manifold kit from above).
Replacing the old controller
Providing Power
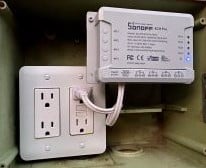
Unfortunately I did not have access to an outlet anywhere near where I needed to install the Irrigation Controller. So my first task was to figure out where I could tap into power to get an outlet for the controller. I won’t go into more details on this step, you should probably hire an electrician.
Connecting the water
This was the single most troublesome step. To sum it up: mistakes were made, it took me 3 attempts (with a 2 month delay in between attempt #2 and attempt #3), but is now leak free!
Programming the controller
The basic operation – turning relays on and off – isn’t much different than turning a floor fan on and off with an ESPHome controlled smart plug. However this controller has to be able to manage up to four relays at once not just one.
Countdown timer
Rather than using a simple delay action, I used @broxy70’s countdown timer code, so I could display the remaining time in Home Assistant. The following is a snippet of code that tracks the Zone1’s time remaining and exposes the current value as a sensor. This code will also turn off the relay when the countdown reaches zero.
Note:
lambdais raw Arduino/C++ code.
1
2
3
4
5
6
7
8
9
10
11
12
13
14
15
16
17
18
19
20
21
22
23
24
25
26
27
28
29
30
31
32
33
34
35
36
37
38
39
40
41
42
43
44
45
46
47
48
49
50
51
52
53
54
55
56
57
58
59
60
61
62
63
64
65
66
67
68
69
70
71
72
73
74
75
76
77
78
79
80
81
82
83
84
85
86
87
88
89

globals:
  # Irrigation time remaining
  - id: remaining_time1
    type: int
    restore_value: no
    initial_value: "300"

  # Store previous values to verify change.
  - id: remaining_time1_previous
    type: int
    restore_value: no
    initial_value: "0"

sensor:
  # Countdown sensors.
  - platform: template
    name: Irrigation Zone1 Remaining
    id: irrigation_zone1_remaining
    lambda: "return 0;"
    accuracy_decimals: 0
    unit_of_measurement: minutes
    icon: mdi:timer
    on_value:
      then:
        - if:
            condition:
              lambda: return id(remaining_time1) == 0;
            then:
              - switch.turn_off: relay1

switch:
  # Relays which trigger solenoids
  - platform: gpio
    id: relay1
    pin: $relay1_gpio
    on_turn_on:
      then:
        # Start the countdown timer.
        - globals.set:
            id: remaining_time1
            value: !lambda return id(irrigation_zone1_duration).state * 60;

        # Show the remaining time.
        - sensor.template.publish:
            id: irrigation_zone1_remaining
            state: !lambda return id(irrigation_zone1_duration).state;

        # Show the "Next Time" as "now".
        - text_sensor.template.publish:
            id: irrigation_zone1_next
            state: "now"
    on_turn_off:
      then:
        - sensor.template.publish:
            id: irrigation_zone1_remaining
            state: "0"

        # Update the next scheduled run time.
        - text_sensor.template.publish:
            id: irrigation_zone1_next
            state: !lambda |-
              return update_next_runtime(id(irrigation_zone1_times).state);

# Update the countdown timers every 5 seconds.
interval:
  - interval: 5s
    then:
      - lambda: |-
          if (id(remaining_time1) > 0) {
            // Store the previous time.
            id(remaining_time1_previous) = id(remaining_time1);

            // When the relay is on.
            if (id(relay1).state) {
              // Decrement the timer.
              id(remaining_time1) -= 5;

              // Turn off the relay when the time reaches zero.
              if (id(remaining_time1) <= 0) {
                id(relay1).turn_off();
                id(remaining_time1) = 0;
              }
            }

            // Update the remaining time display.
            if (id(remaining_time1_previous) != id(remaining_time1)) {
              id(irrigation_zone1_remaining).publish_state( (id(remaining_time1)/60) + 1 );
            }
          }
Home Assistant User Interface
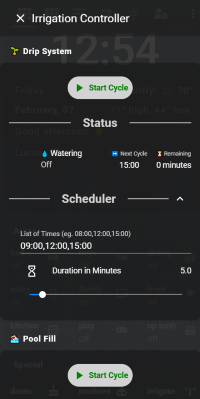
One of my goals is to “Use Home Assistant only to edit the schedule, manually start a cycle, and to monitor progress.” If you’ve used ESPHome to control a relay in a smart plug before, you know how expose the relay as a switch in Home Assistant. The code above demonstrates how to keep track of a countdown timer, and expose the value as a sensor to Home Assistant. As you can see in the screenshot, each zone has a manual Start/Stop Cycle button, a “⏳ Remaining” sensor, and a way to edit the schedule.
Storing the schedule
It was relatively easy to design the User Interface. But now I have to store the values on the controller. I decided to use a comma separated list of start times. It seemed like the most straight forward way to store a varying number of start times per zone. The duration is set by a slider that ranges from 0 to 60 minutes. The following is a snippet of code that retrieves Zone1’s schedule from Home Assistant and stores them as separate internal sensors.
1
2
3
4
5
6
7
8
9
10
11
12
13
14
15
16
17
18
19
20
21
22
23
24
25
26
27
28
29
30
31
32
33
34
35
36
37
38

sensor:
  # Retrieve durations settings from the Home Assistant UI.
  - platform: homeassistant
    id: ui_zone1_duration
    entity_id: input_number.irrigation_zone1_duration
    on_value:
      then:
        - sensor.template.publish:
            id: irrigation_zone1_duration
            state: !lambda return id(ui_zone1_duration).state;

  # Store durations.
  - platform: template
    name: Irrigation Zone1 Duration
    id: irrigation_zone1_duration

text_sensor:
  # Retrieve list of times from the Home Assistant UI.
  - platform: homeassistant
    id: ui_zone1_times
    entity_id: input_text.irrigation_zone1_times
    on_value:
      then:
        - text_sensor.template.publish:
            id: irrigation_zone1_times
            state: !lambda return id(ui_zone1_times).state;

  # Store time lists.
  - platform: template
    name: Irrigation Zone1 Times
    id: irrigation_zone1_times
    on_value:
      then:
        # Update the next scheduled run time.
        - text_sensor.template.publish:
            id: irrigation_zone1_next
            state: !lambda |-
              return update_next_runtime(id(irrigation_zone1_times).state);
Running the schedule
This required me to ask questions and learn modern C++ programming. I have not done much with any C programming language since I took a C class in community college in the mid ’90s. The portion of the code which triggers the schedule check is somewhat straight forward.
Note: this part of the code syncronizes the Irrigation Controller’s clock with my Home Assistant server’s clock. This could where the goal of running without Home Assistant could fail. I may change to
platform: sntplater.
1
2
3
4
5
6
7
8
9
10
11
12

# Time based automations.
time:
  - platform: homeassistant
    id: homeassistant_time
    on_time:
      - seconds: 0
        minutes: /1
        then:
          - lambda: |-
              if (scheduled_runtime(id(irrigation_zone1_next).state.c_str())) {
                id(irrigation_zone1).turn_on();
              }
irrigation.h: C++ custom library
The following code contains two functions: bool scheduled_runtime(string); and string update_next_runtime(string);. The above code calls scheduled_runtime() once every minute. When a relay is turned off, update_next_runtime() updates the next runtime sensor.
1
2
3
4
5
6
7
8
9
10
11
12
13
14
15
16
17
18
19
20
21
22
23
24
25
26
27
28
29
30
31
32
33
34
35
36
37
38
39
40
41
42
43
44
45
46
47
48
49
50
51
52
53
54
55
56
57
58
59
60
61
62
63
64
65
66
67
68
69
70
71
72
73
74
75
76

#include "esphome.h"
using namespace std;

// Declare functions before calling them.
bool scheduled_runtime(string);
string update_next_runtime(string);

bool scheduled_runtime(string time) {
  // Retrieve the current time.
  auto time_now = id(homeassistant_time).now();
  int time_hour = time_now.hour;
  int time_minute = time_now.minute;

  // Split the hour and minutes.
  int next_hour = atoi(time.substr(0,2).c_str());
  int next_minute = atoi(time.substr(3,2).c_str());

  //ESP_LOGD("scheduled_runtime()", "now: %i:%i", next_hour, next_minute);
  return (time_hour == next_hour && time_minute == next_minute);
}

string update_next_runtime(string time_list) {
  // Initialize variables.
  vector<string> times;
  vector<string> next_time;
  char * token;

  // Split the list of run times into an array.
  token = strtok(&time_list[0], ",");
  while (token != NULL) {
    times.push_back(token);
    token = strtok(NULL, ",");
  }

  // Stop now if the list does not contain more than one time.
  if (times.size() <= 1) {
    return time_list;
  }

  // Retrieve the current time.
  auto time_now = id(homeassistant_time).now();
  int time_hour = time_now.hour;
  int time_minute = time_now.minute;

  // Initialize variables.
  int next_hour = 0;
  int next_minute = 0;
  int index = 0;
  int loop_count = 0;
  int time_count = times.size()-1;

  // Compare the list of times with the current time, and return the next in the list.
  //ESP_LOGD("update_next_runtime", "now: %i:%i", hour, minute);
  for (string time : times) {
    // Retrieve the next scheduled time from the list.
    next_hour = atoi(time.substr(0,2).c_str());
    next_minute = atoi(time.substr(3,2).c_str());

    //ESP_LOGD("update_next_runtime", "next_hour: %s", time.c_str());
    if (time_hour < next_hour || (time_hour == next_hour && time_minute < next_minute)) {
      // Return this time if the next hour is greater than the current hour.
      return times[loop_count].c_str();
      break;
    // When we reach the end of our schedule for the day, return the first time of tomorrow.
    } else if (time_count == loop_count) {
      return times[0].c_str();
      break;
    }

    // Increment the loop counter and array index.
    loop_count += 1;
    index += 2;
  }

  return "unknown";
}
Conclusion
A couple of years ago I would not have believed that I could build my own Irrigation Controller that was more reliable than a $100 off the shelf unit. My Irrigation Controller has proved me wrong with an uptime of 145 hours so far! I have learned a lot from this project, and am very pleased with the result! My wife’s plants are happy to be watered every day and my pool pump is happy to no longer be sucking in air because the water got too low.
Source Code
The ESPHome source code to my Irrigation Project, and all of my other ESPHome projects can be found in this GitHub Repository. Look specifically at irrigation.yaml and irrigation.h.
The source code to my Home Assistant Configuration can be found in this GitHub Repository.
Home Assistant Community Thanks
Thank you to Home Assistant Community members: @jlax47, @nickrout, @glmnet, and @risk. Your assistance was crucial to my success with this project!